Raspberry Pi’s and other small single-board computers make great devices to host a plethora of different applications. Without a doubt, Home Assistant is one of the most popular home automation platforms to be installed on these small, low-power devices.
Sadly, there are times where these devices just don’t have the compute power to carry out some of the more intensive tasks. Or you may have old hardware lying around that is no longer used. In this guide, we will show you how to install Home Assistant in Virtualbox on a Debian server. We will go over each of the steps needed to take an old computer or laptop, install Debian Buster, set up Virtualbox, and then get Home Assistant running inside the Virtual Machine. Towards the end, I will walk you through the extra steps needed to ensure your USB devices are passed through to the VM correctly and that the Virtual Machine we are using for Home Assistant starts automatically after a reboot or sudden power loss.
If you already have a Linux server set up then you may wish to just skip straight ahead to installing Home Assistant in Virtualbox section or even to the parts that contain the USB passthrough information.
Why Install Home Assistant in Virtualbox?
As I have already mentioned, small single-board computers, like the Raspberry Pi are great little devices, but they don’t hold up when you need to do intensive tasks. The web-based user interface can be a bit slow at times, even more so when requesting data from the database.
What’s more, these low powered devices typically run from an SD Card, which are not intended for the constant writing of data that can happen when running a Home Assistant. It’s not uncommon for these SD Cards to just randomly die after 12/24 months of use, which can be a real pain having to set everything back up again.
By utilising the power of virtualisation, we can have desktop like performance without having to dedicate the entire device to running Home Assistant. You can, run serval applications inside virtual machines on the same host. If this sound like the perfect solution, then follow this guide to installing Home Assistant in Virtualbox.
The other benefits of using this method to install home assistant. You will be left with a fully functioning Debian based server. Having a dedicated Debian server will give you the freedom to add more VM’s at a later date, or even incorporate Docker, so you can have many applications running on the same machine. Having a dedicated server can be a great addition to your home automation setup.
Hardware Requirements to Install Home Assistant in Virtualbox
For this tutorial, you will need a couple of things. Firstly, you will need an old computer or laptop with a minimum of 4GB of memory. It should have at least one ethernet port, and ideally two USB ports. The installation procedure is the same for both AMD64 and Intel 64 architectures. For the install, we will also need a USB stick, 16GB or larger should suffice. Secondly, you will need a virtualisation software. I would recommend using Virtualbox, it’s easy to use, free and secure. If you are already using Virtualbox then all the installation steps will be the same for both Linux and Windows users.
Making Debian Bootable USB
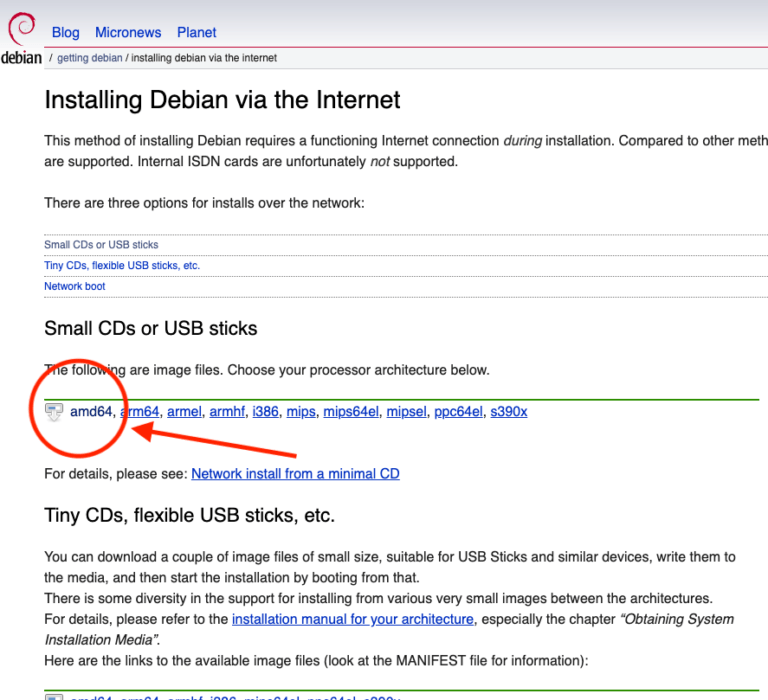
To make the install media for Debian, we need to first get the ISO file from the Debian website, if you are installing this on an old PC or laptop, you will likely need the amd64.iso file. Save this file to your computer’s hard drive and keep it handy for later steps.
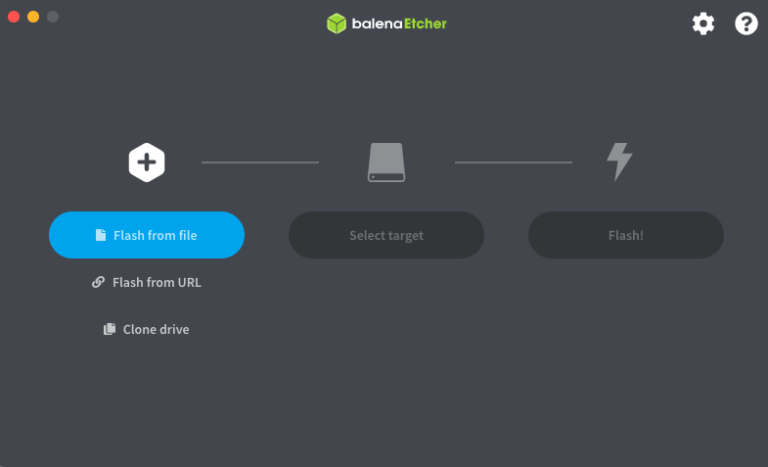
The next tool we will need is something called Etcher, we will use this to flash the Debian ISO file to a portable USB drive. The Etcher program enables users to easily flash their SD cards, and it works across all major platforms. Simply visit the balena website, and download Etcher. Once the tool is installed you will be greeted with a screen that looks like this:
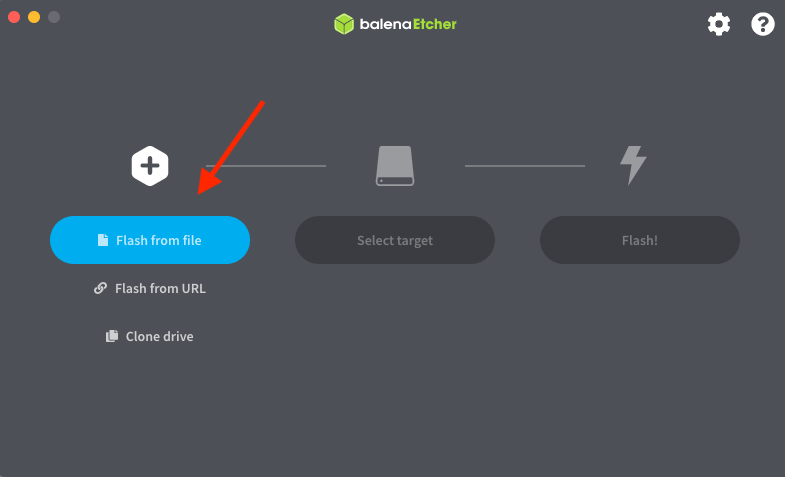
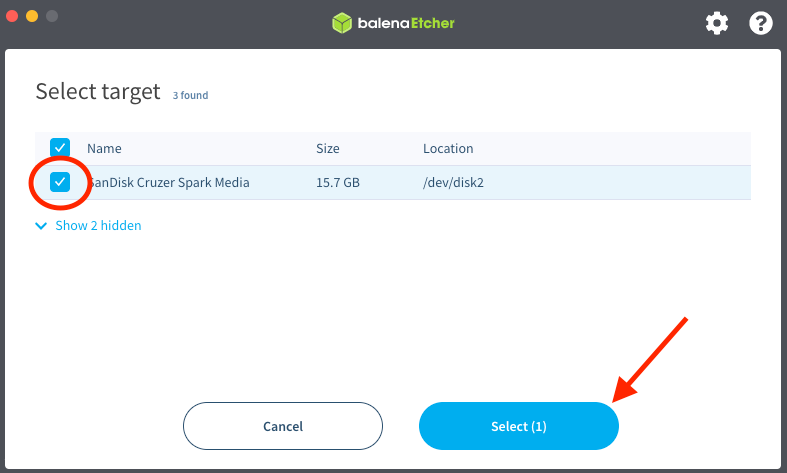
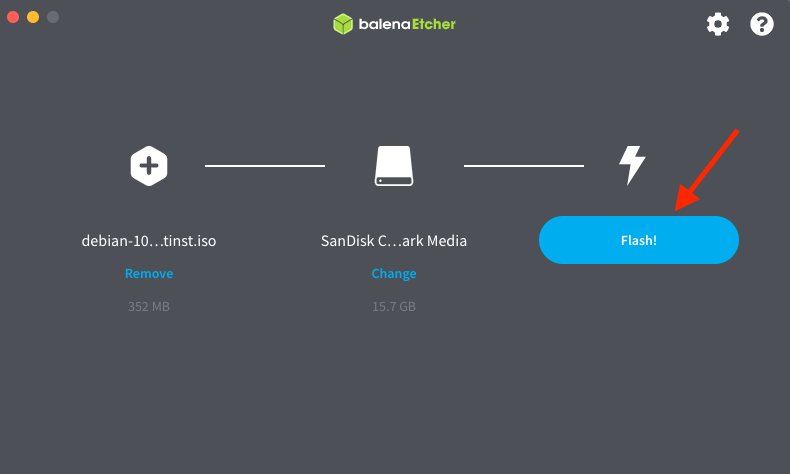
Use these simple steps to flash the Debian ISO to the UBS flash drive
Step 1:
Step 2:

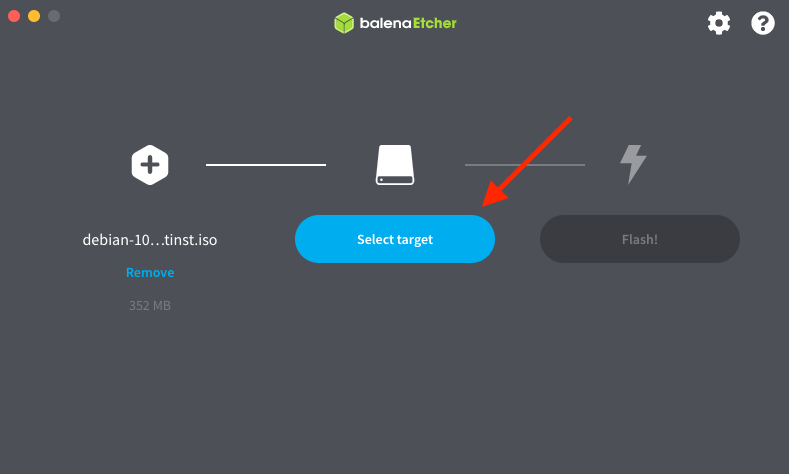
Step 3:
Step 4:
Step 5:
Step 6:
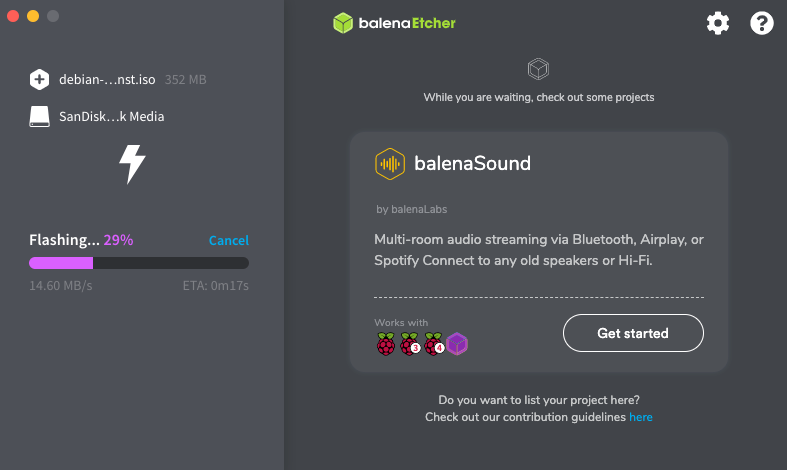
Just before Etcher beings flashing the Debian ISO to the UBS flash drive, you may get a popup notification asking for the admin password for the computer you are using, simply enter this password and the tool will begin to install the Debian ISO. This process can take a several minutes to complete.
Once the Etcher tool has finished flashing the Debian ISO to the USB drive, eject/remove the USB flash drive from your commuter.
Installing Debian
Please note – before we install Debian, this process will overwrite any existing data on your operating system drive. The drive will be wiped clean, erasing all of the existing data. Before continuing, please make sure that you are comfortable with this and that you have a backup of any data you need.
With your computer in an off state, insert the USB device we made using Etcher in the previous step, and turn on the machine. It should detect the USB and boot into the configuration screen for Debian automatically. If this doesn’t happen, you may need to reboot the computer and boot into the BIOS. Many manufacturers have their own version of BIOS so it would be impossible to list every method, generally speaking, you would use one of the designated F-keys during the early start of the boot process to enter the bios (this will likely be displayed on a splash screen during the first few seconds when the computer is first turned on). You would want to navigate to Boot Setting, and find the UBS device and set it to boot from this device.
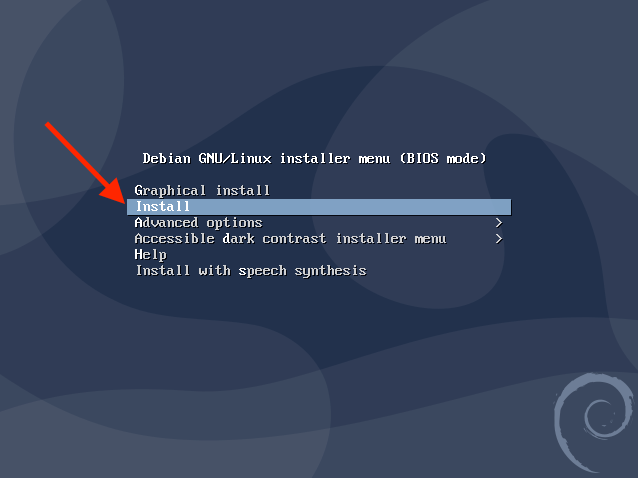
Once you have booted into the Debian installer, you should be greeted with a screen that looks like this:
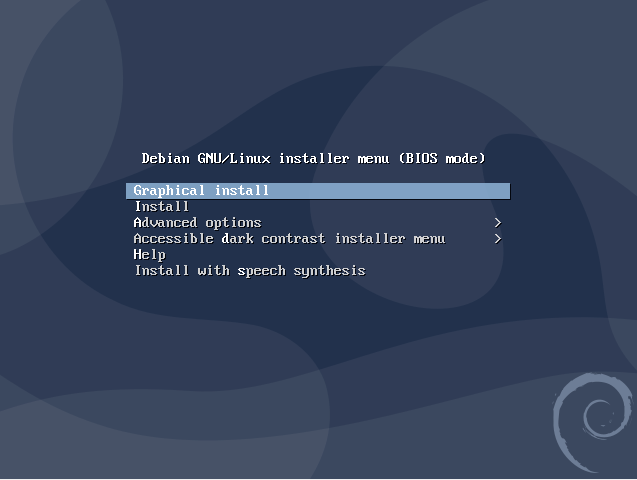
To begin installing Debian, select the “Install” option as hi-lighted below:
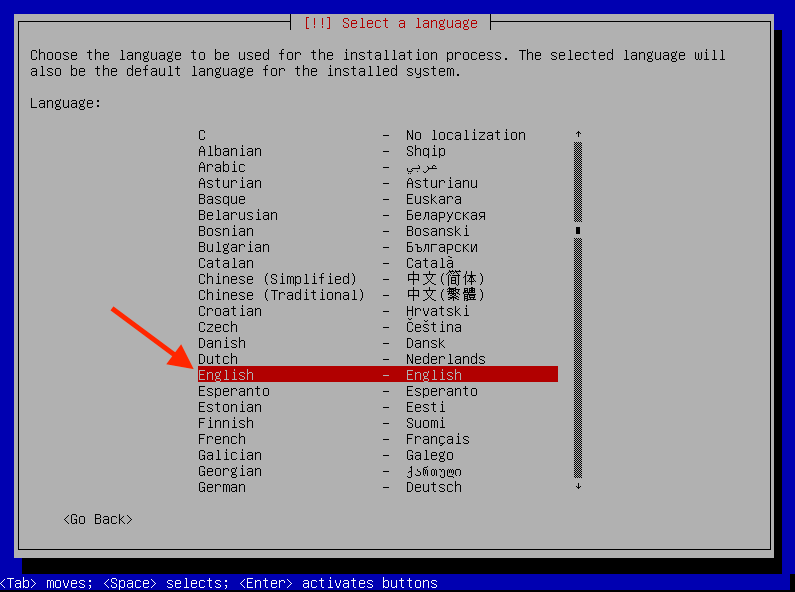
Then choose your language:
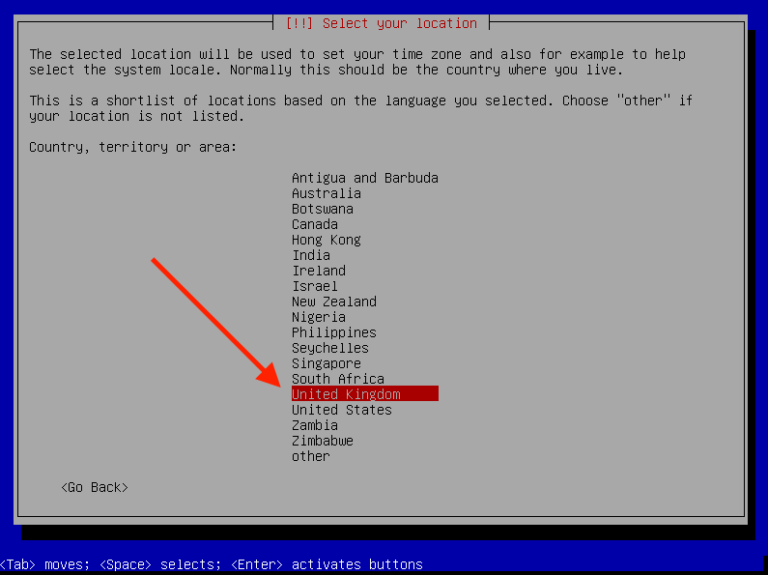
Now set your country:
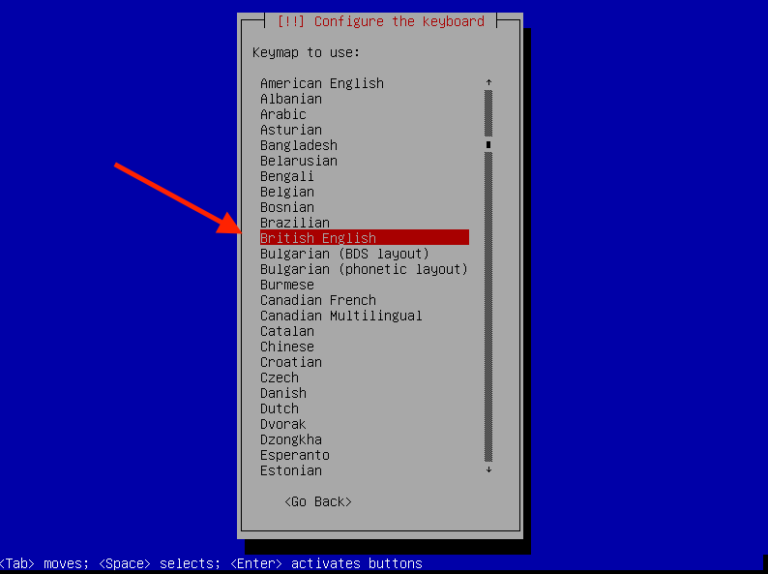
Choose your keyboard layout:
Once those settings have been entered, the system will go and fetch the appropriate packages needed for the next part of the install.
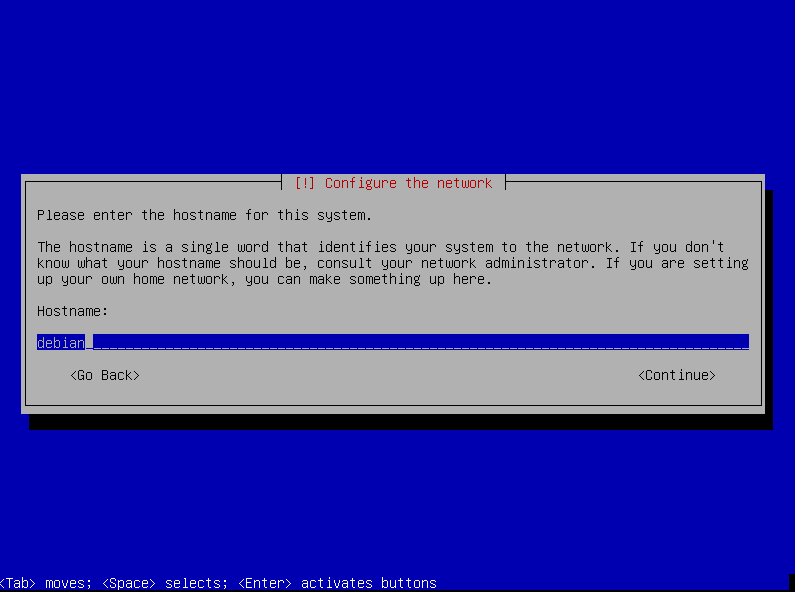
The next part in the install process will give us the option to configure some of the network settings for the sever, including the hostname, this name will be use to identify the device on the network, you could leave it as default, which is “Debian” or change it to something else.
Domain Name, can be left blank
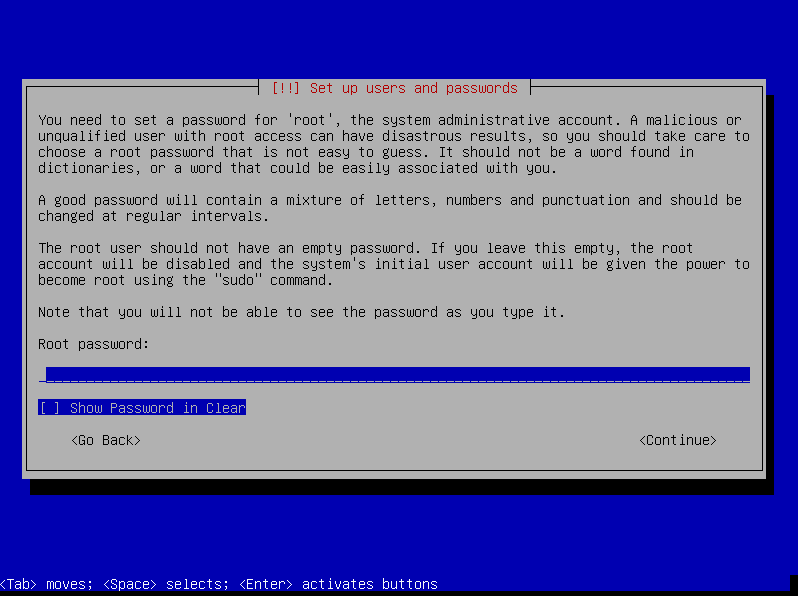
Next we get the option to set the root password. Debian will create two users for the system, one as Root and the other as a normal user. The root account is the account with all the elevated privileges, in an ideal world, we don’t want to be using this account. Simply because anything we do when we are using the account will be committed without question. So it’s very easy to get into a mess when using the root account.
So with this in mind, create a password for the root account, make a note of the password as we will need this later in this guide:
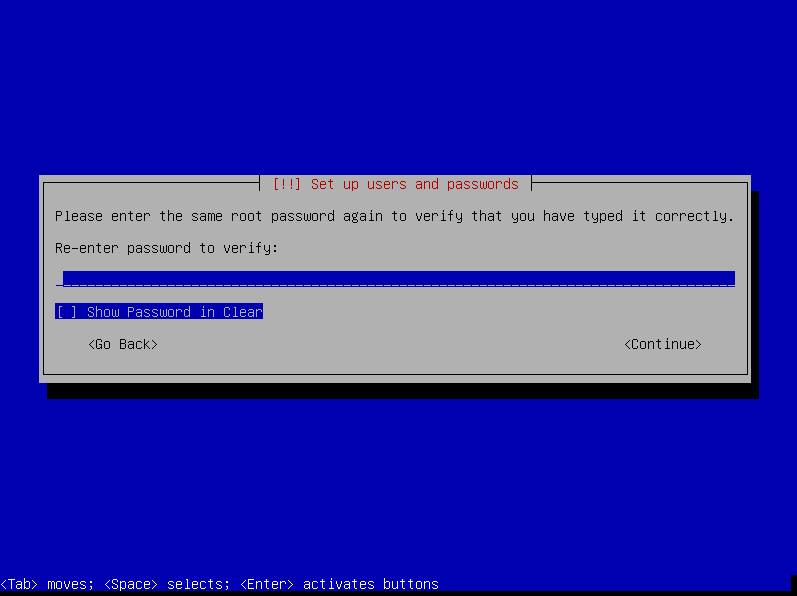
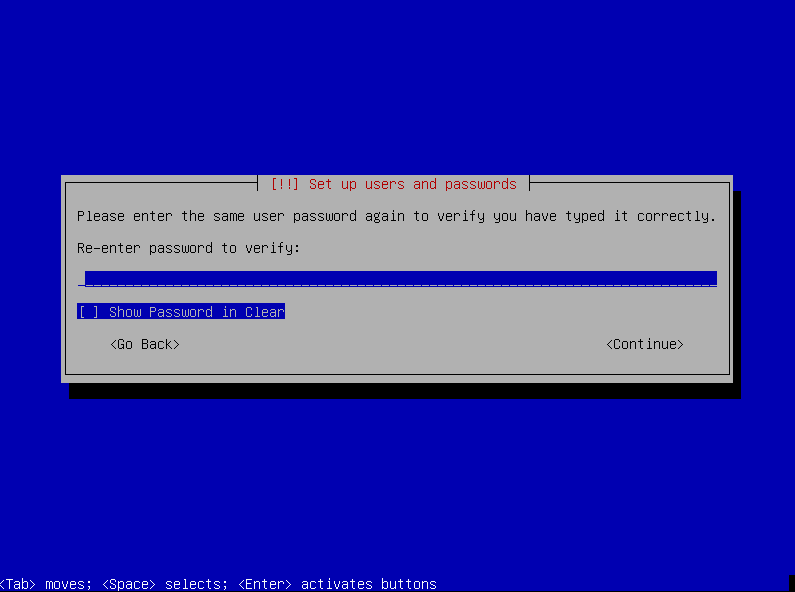
Then verify the password for the root account:
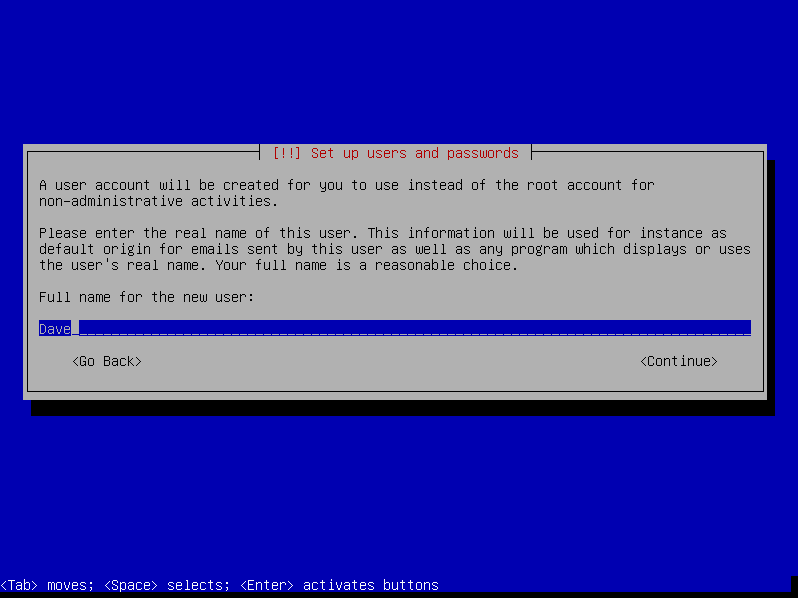
Now we need to create the user account we will use whenever we access the machine:
First we need to name the user:
Then set a password for the user:

And of course, we need to verify the password on the user account.
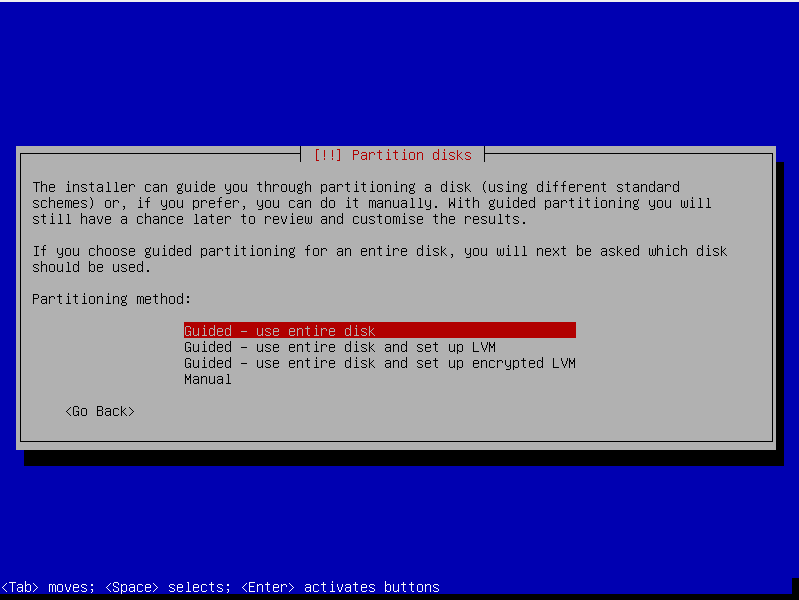
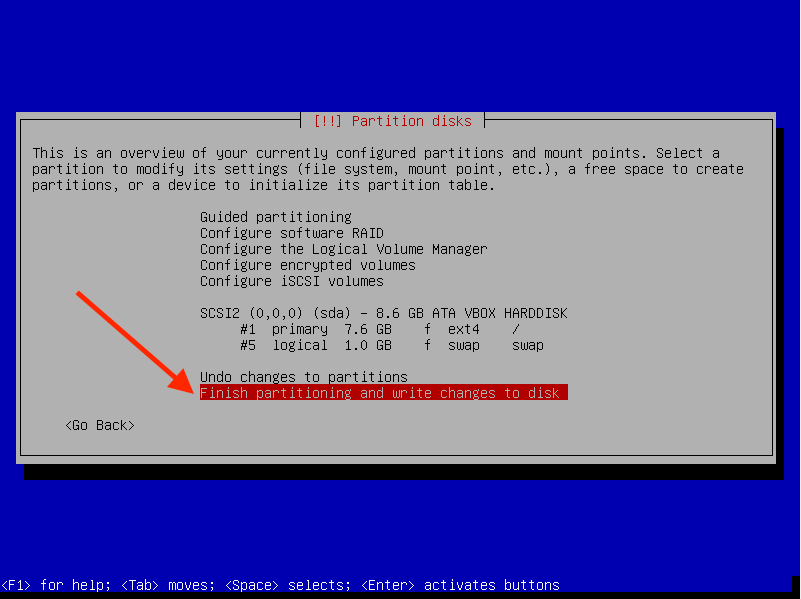
Now we have our users accounts configured, we need to go about setting up the install, file system and partitioning the drive.
Select – use entire disk
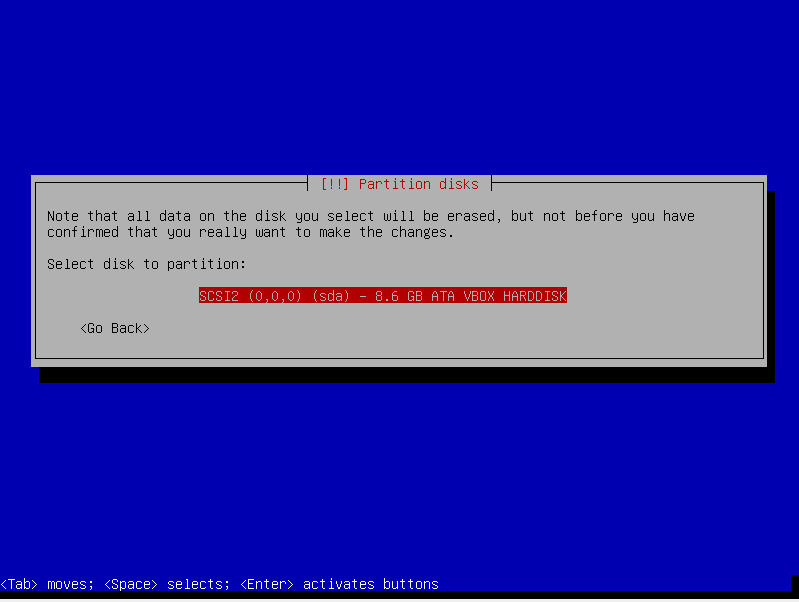
Ensure you have the correct disk selected
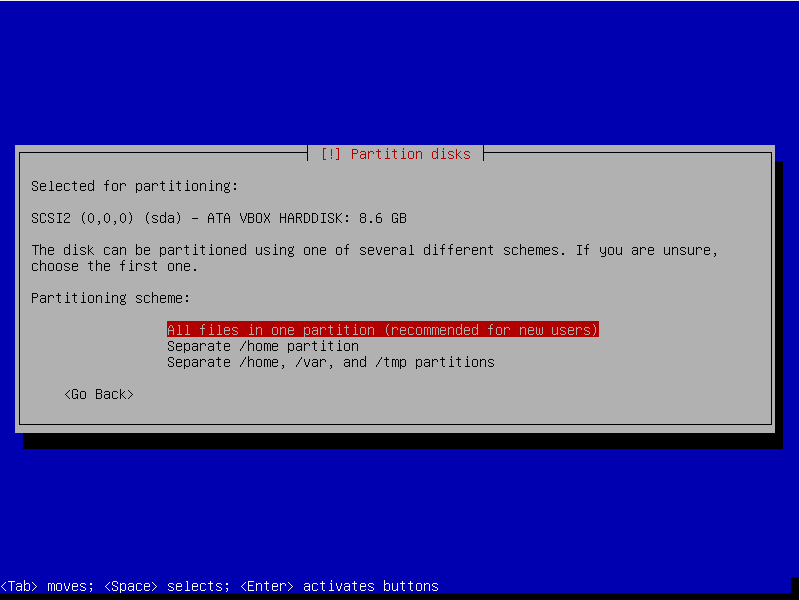
To make the install as easy as possible, let’s keep all the files in one partition.
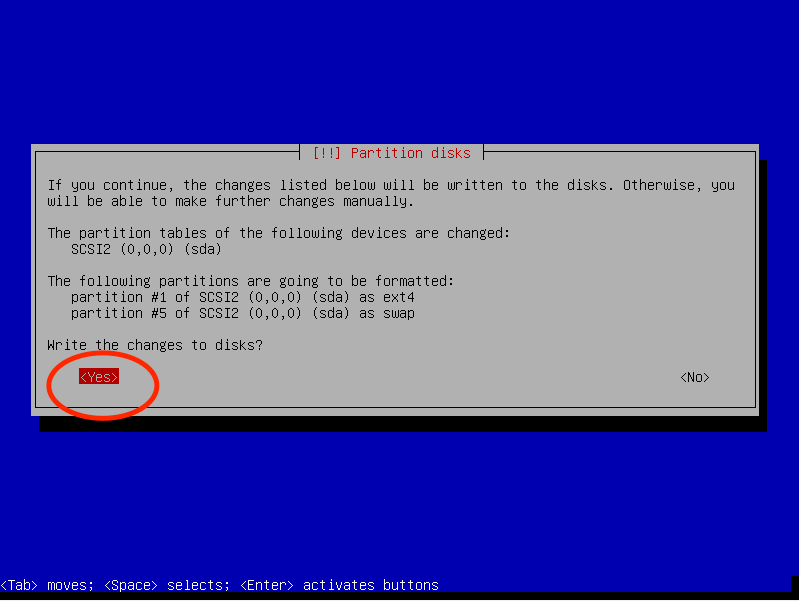
Next we will need to confirm the changes before Debian will begin the install process:
Now the system will go and fetch the packages that it will need for the install and also see if there are any additional drivers it needs to finish the install.
Configure the package manager – this is what we will use to download applications from the internet. Its best to choose a location close to your region in the world.
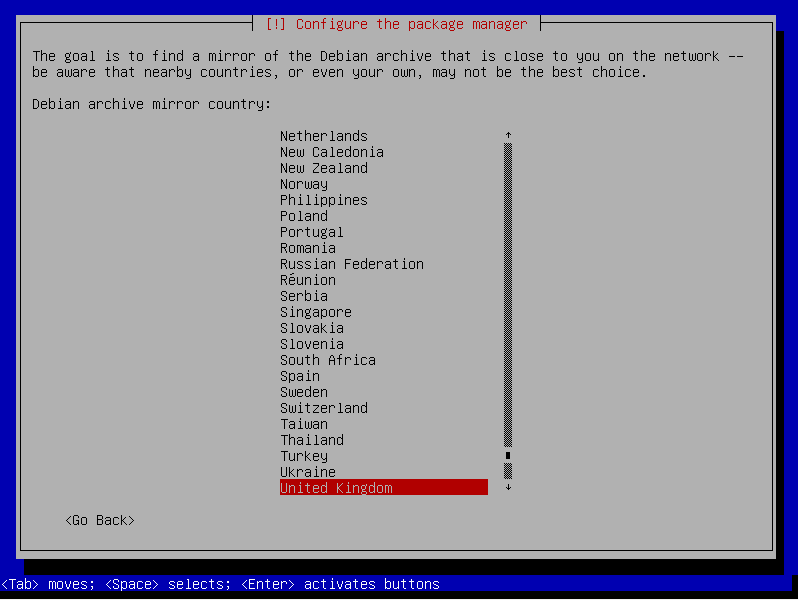
Select a server from the list, generally the deb.debain.org server is a good choice.

We are not using a proxy, so we don’t need to enter any information for the next part, if you are using a proxy, enter the information at this stage, this won’t be needed for many people.

The system will now get ready for the next part of the configuration.
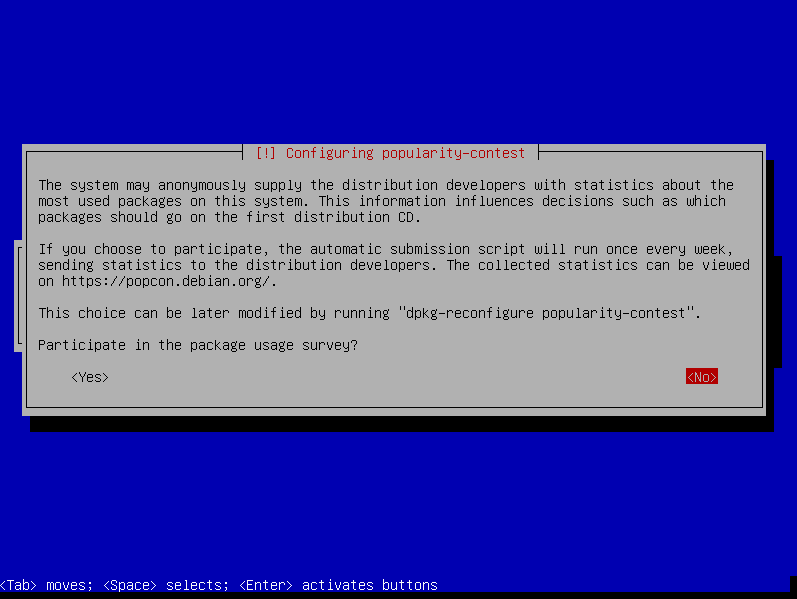
During the process, you will be asked if you want to participate in the “popularity contest” so the developer of Debian can see what are the most popular packages people have installed, personally, I don’t participate in this, but its personal choice if you want to. Select the answer of your choosing, it won’t effect the install of the system.
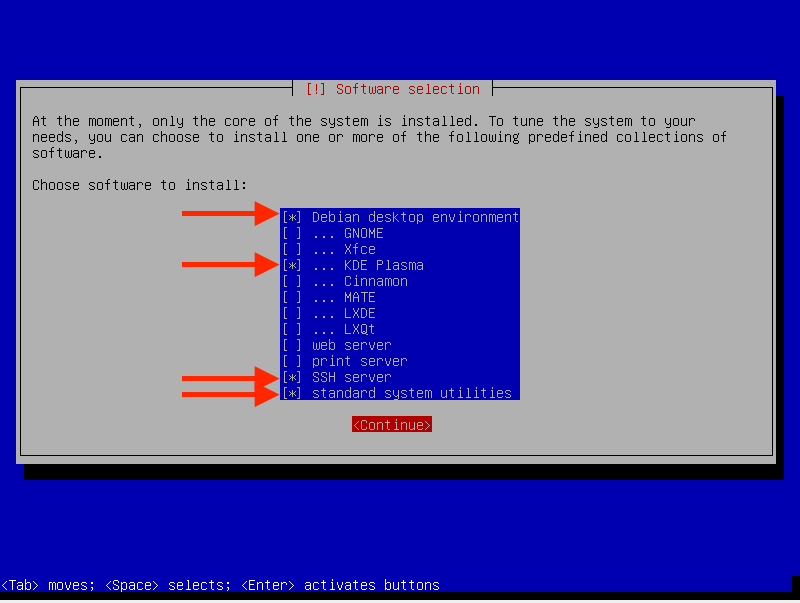
Now we need to configure what software we want installing, for the sake of the guide, I would recommend you stick to the options I have hi-lighted I the image below.
At this point the main install will begin, the system will be downloading information and getting things setup – this can take between 5 / 20 mins depending on your hardware. Use this time to have a break, grab a beverage, you’ve done great getting this far.
When the install is finished, it will ask to install the GRUB Boot Loader to the Master Boot Record, select yes and proceeded with the install.
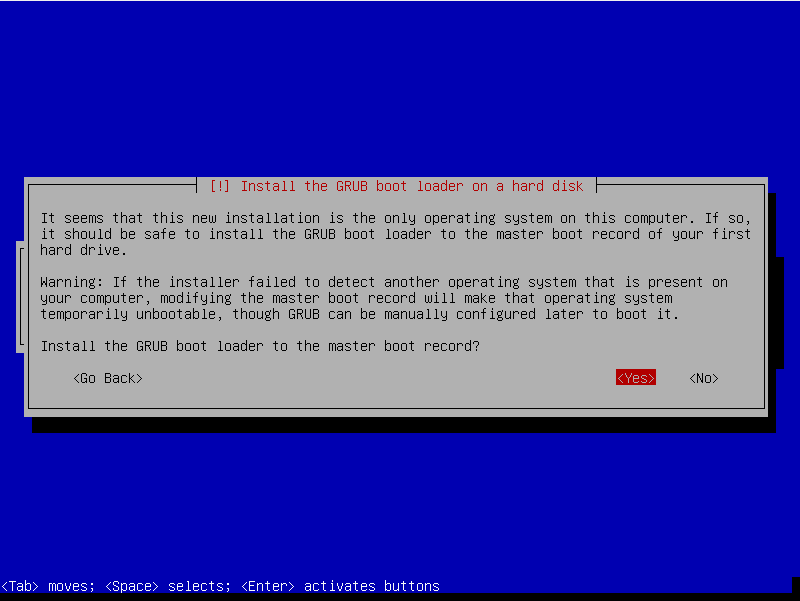
Select your hard drive from the list to install the GRUB Boot Loader.

When you see this screen – the install is now completed and you can remove the install USB we used to install Debian on the system.
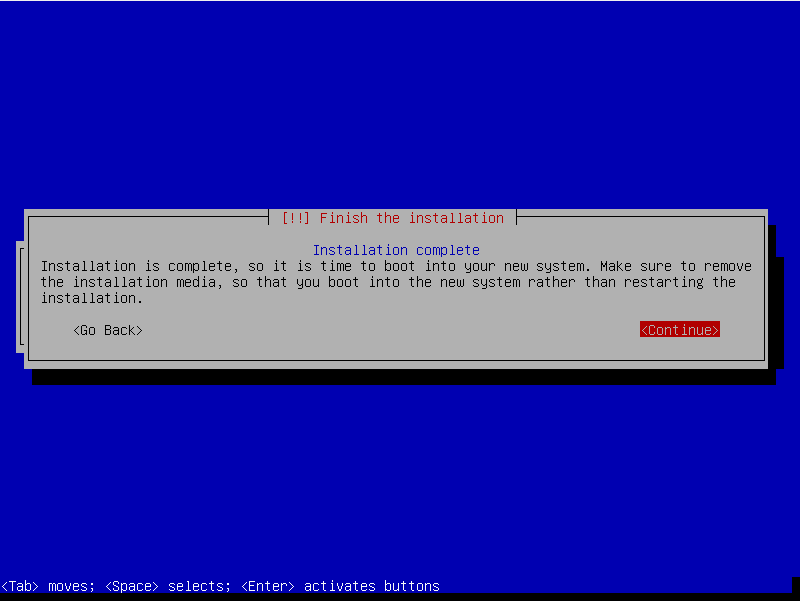
After removing the USB – reboot the machine and let it boot into the Debian operating system we have just installed.
Logging into Debian for the first time
When your system boots up after removing the UBS we sued to install Debain, you should be greeted with a login screen that has the “user” account selected.
Remember we made two separate users when installing Debian, simply enter the password we set earlier for the user account (not the root account).

Now we have logged into the Desktop environment, we will need to escalate the privileges of the user account, so we can have some of the functions that come with the root account, but in a safer manner. One of the first things we will need to do as add our user to the Sudo Group. To the this we will need to issue a few commands via the linux command line, follow these steps to gain access to the command line interface.
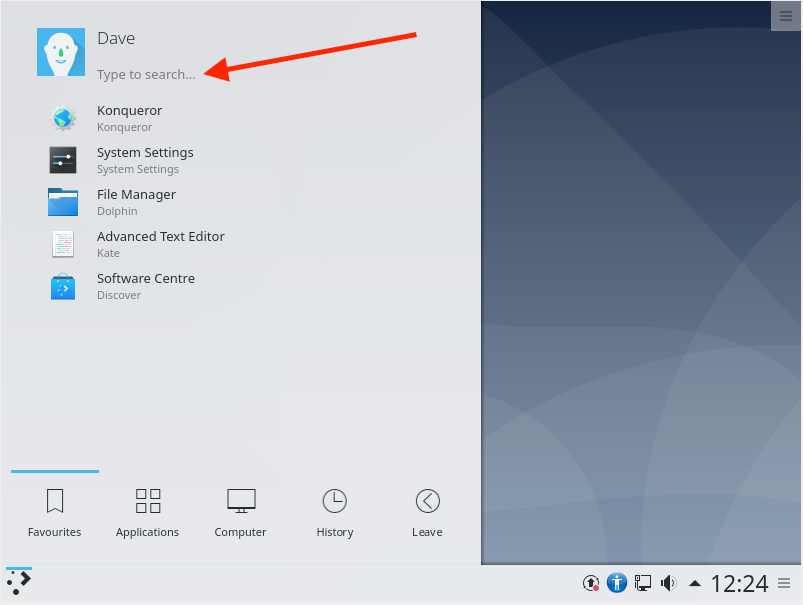
Press the button in the bottom left:
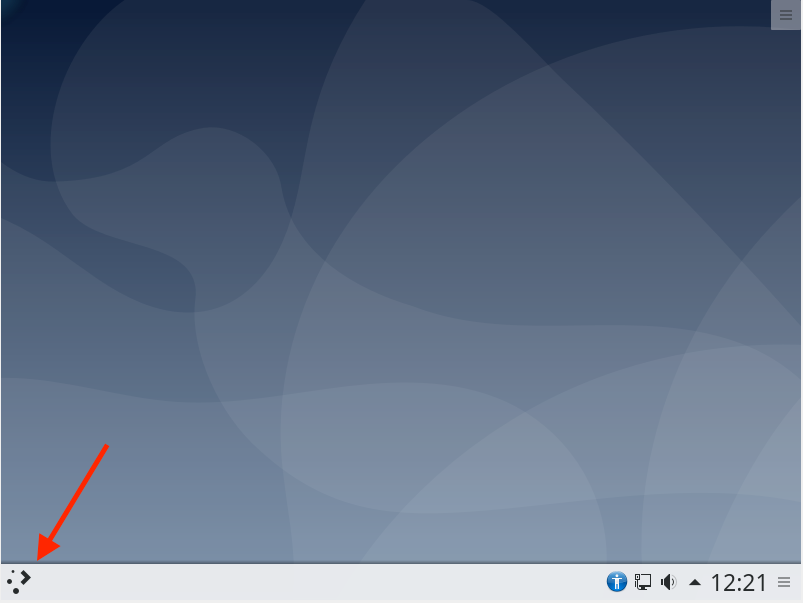
Select the “type to search” function from the menu, and type: “Konsole”
With the command line interface open, the first command we will need to type is:
su - root
Now enter the password for the root account to gain access.
To add our user account to the Sudo Group we will use the “usermod” command, there are other method’s, but I find this to be the quickest way to add a user to the sudo group.
Type the following into the command line interface (replacing “Dave” with the name of your user account):
sudo usermod -a -G sudo dave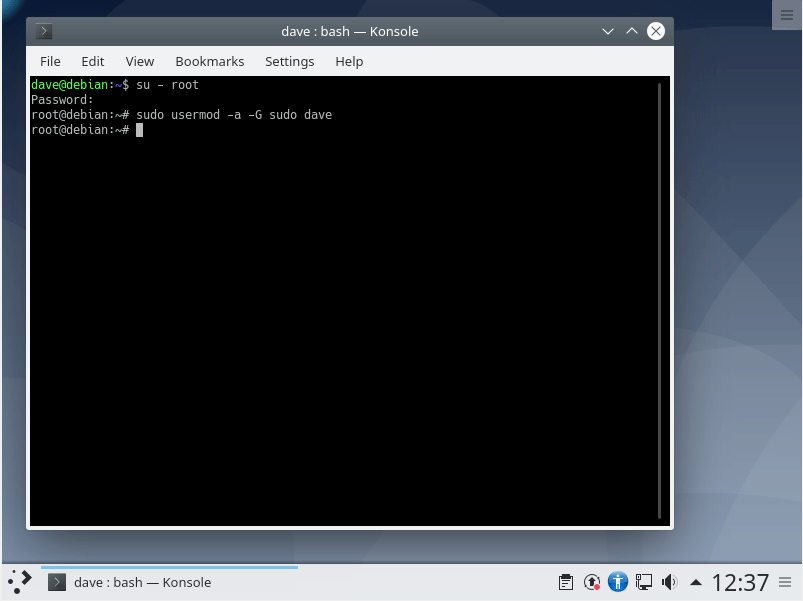
The command won’t return any message that the task has been completed successfully, so we can check this ourselves with the following steps.
Lets use the “su” command a second time to switch user account, back to the normal user (replacing ‘dave’ with the name of your user account).
su - dave
groups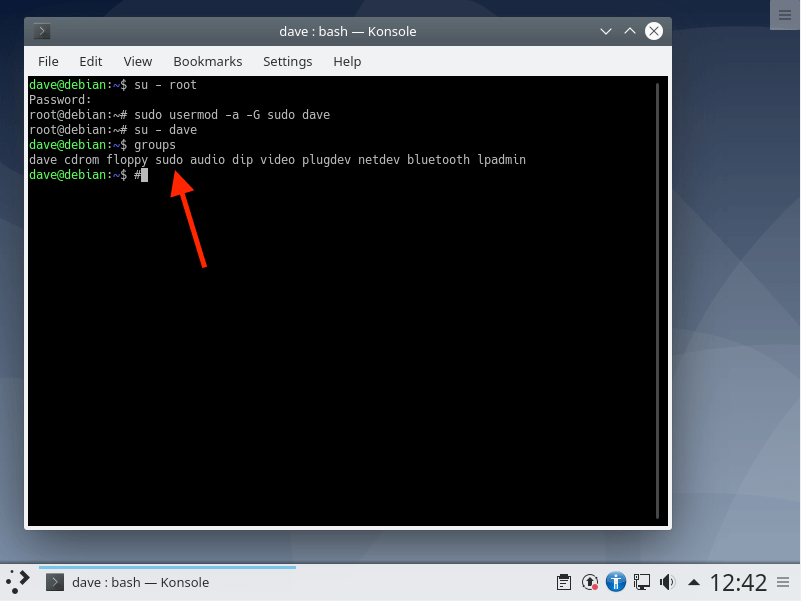
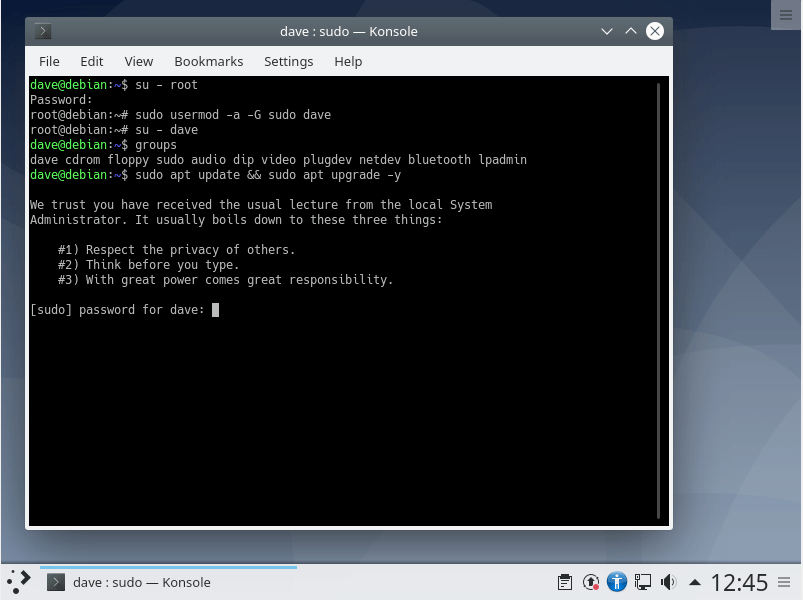
As we can see, the user account is now part of the sudo group, so we should now have access to the sudo commands. We can try this by updating the system using the command line interface, type the following:
sudo apt update && sudo apt upgrade -yWhen you press enter, you will be greeted with a password prompt, and a message that having the privileged access of sudo comes with great power and responsibility, this is because we are using some of the functions that come with the root account.
The system will now go and update all the packages it needs, depending on your system this can take a few minutes.
If you are distracted by all the text on the screen after the packages have been updated, you can clear the screen with the “clear” command:
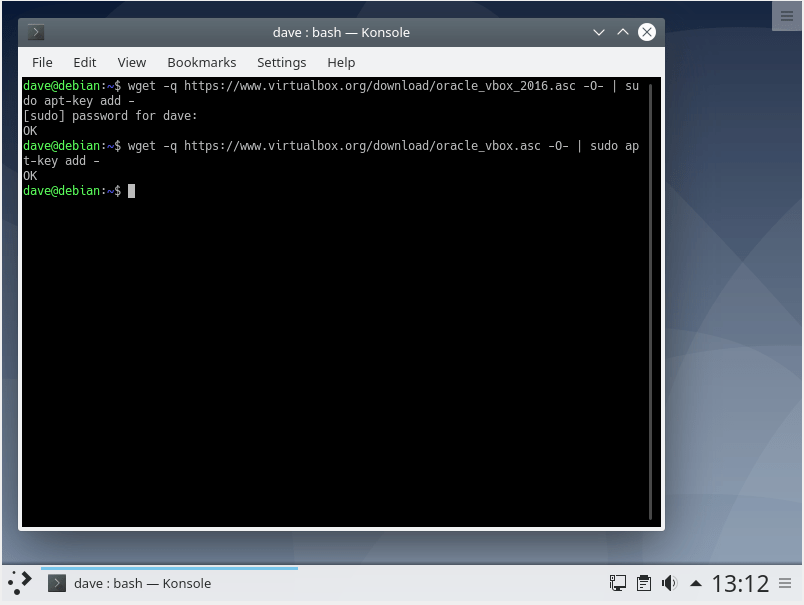
clearTo install Virtualbox, first we will need to import the GPG keys from the Virtualbox repository, to do this we will use the “wget” command.
wget -q https://www.virtualbox.org/download/oracle_vbox_2016.asc -O- | sudo apt-key add -
wget -q https://www.virtualbox.org/download/oracle_vbox.asc -O- | sudo apt-key add -
Both of the commands should return “OK” once they have been entered. The keys have been successfully imported and any new packages from this repository will be treated as trusted.
Now we need to add the apt repository for Virtualbox to our sources list, we can do that with the following commands.
sudo apt install software-properties-common
sudo add-apt-repository "deb [arch=amd64] http://download.virtualbox.org/virtualbox/debian $(lsb_release -cs) contrib"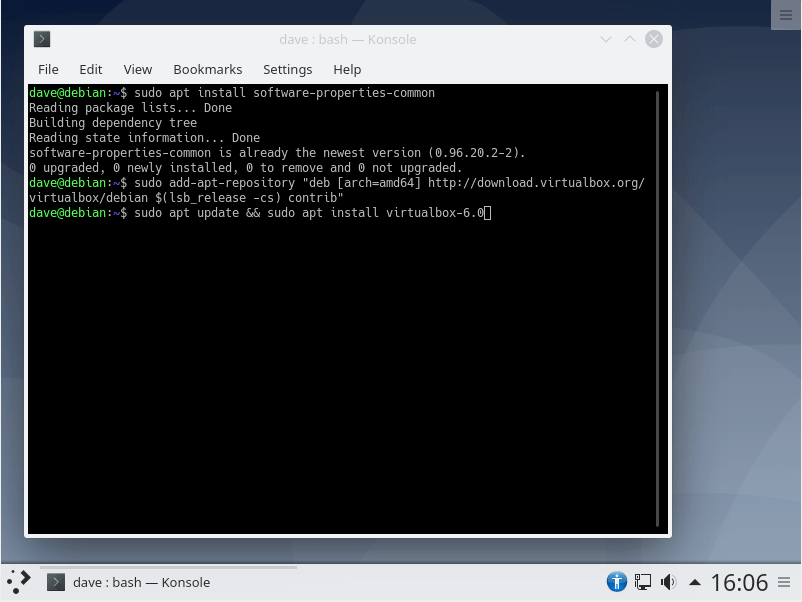
Now the appropriate repositories have been added, we just need to update and install Virtualbox: (Before doing this, please ensure the version number of Virtualbox is the most recent, as this is likely to change with the passage of time.)
sudo apt update && sudo apt install virtualbox-7.0At this point the system will fetch all the packages needed to install Virtualbox, depending on your system, this may take a few minutes.
Once the install of Virtualbox has finished, I would recommend rebooting the system with the following command.
sudo rebootNow the system has booted back up, we are just going to check the install of Virtualbox, you can navigate to the application by using the menu system from the desktop environment.
Applications > System > Virtual Machines
Installing Home Assistant in Virtualbox
Ok, we are now at the point where we can go about installing Home Assistant inside the Virtualbox environment.
One of the first things we will need to do is use the built in Firefox web-browser to get the .vdi file we need to setup Home Assistant. Using the Debian desktop environment, search for Firefox, and navigate to the Home Assistant Install page.
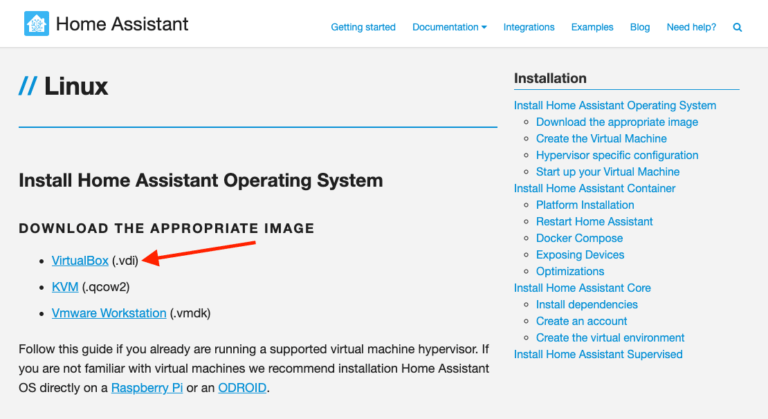
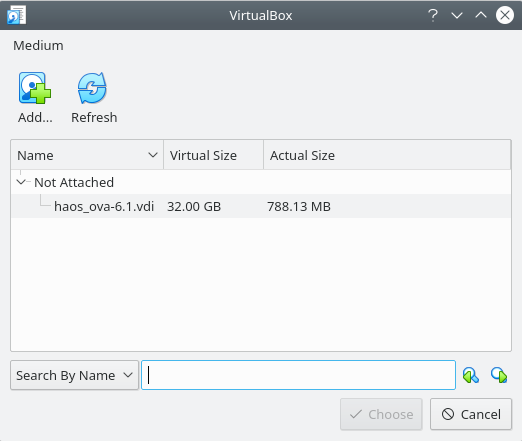
Select the .vdi file, save this to a location so we can locate it later. It should by default go into the Downloads folder, lets go about unpacking the zip file.
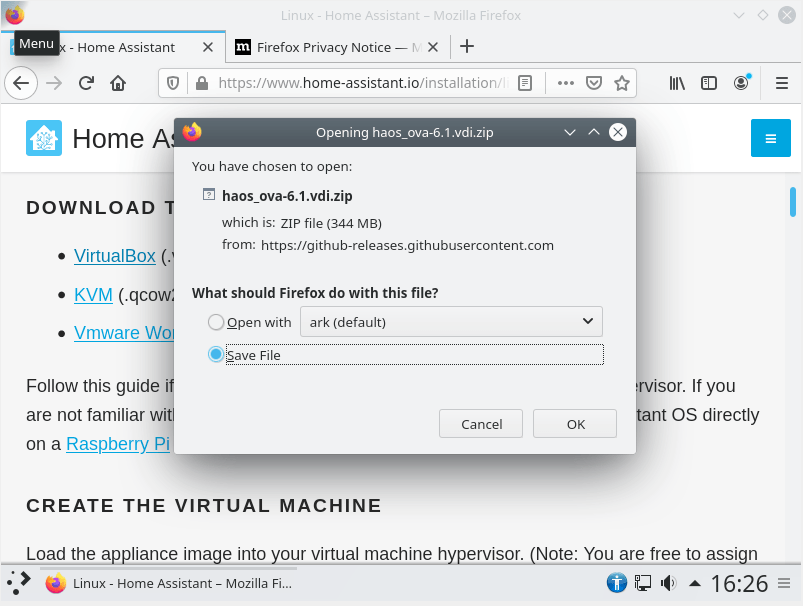
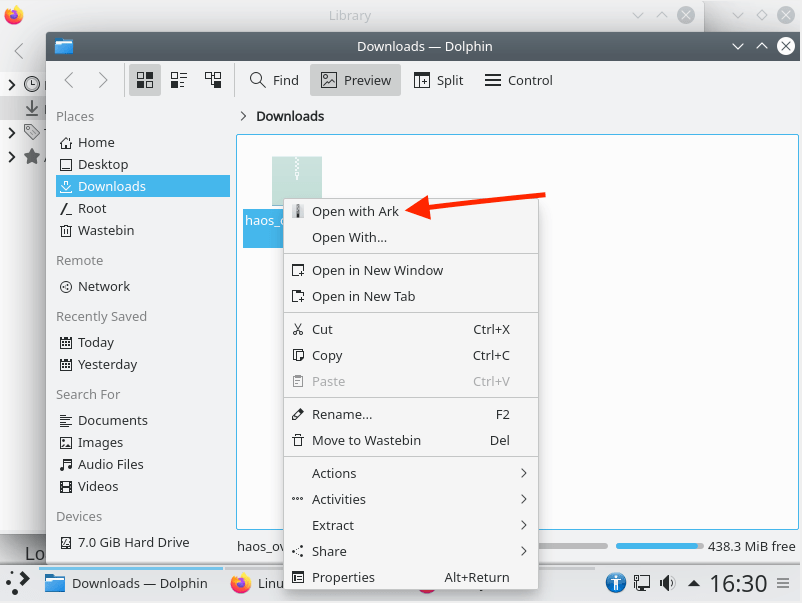

We should now have 2 files in the Downloads section, one that is a zip file and the other as a .vdi file.
Configure Home Assistant within Virtualbox
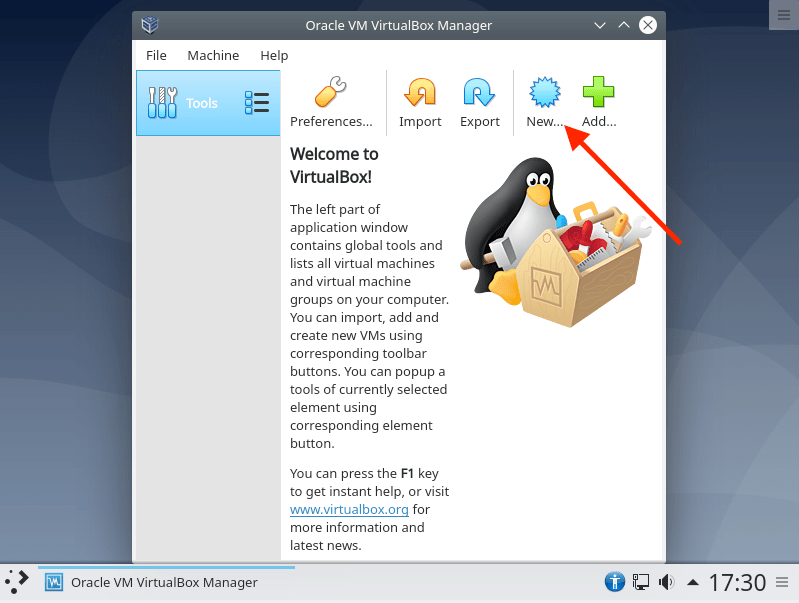
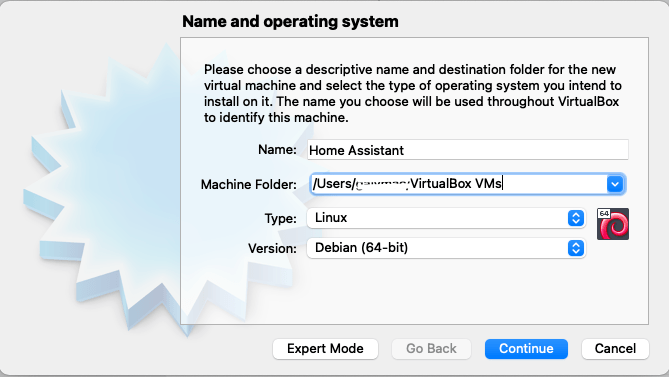
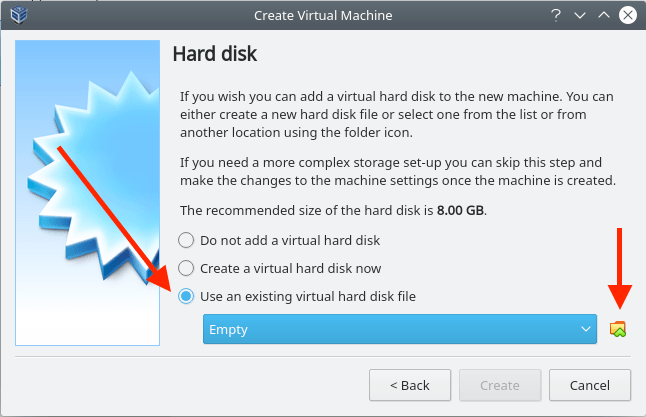
Make a Linux environment for the Home Assistant install.
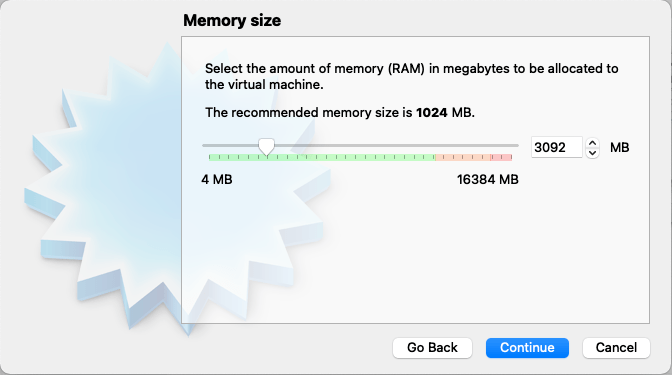
Allocate the RAM you want the system to have, in my example, Im going to allocate about 3gb of ram to this VM. You can change this after the fact if you needed to adjust this later.
Choose the option to use an existing virtual hard disk, then use the folder icon to navigate the to downloads section where we have our .vdi file we downloaded from the Home Assistant website earlier.

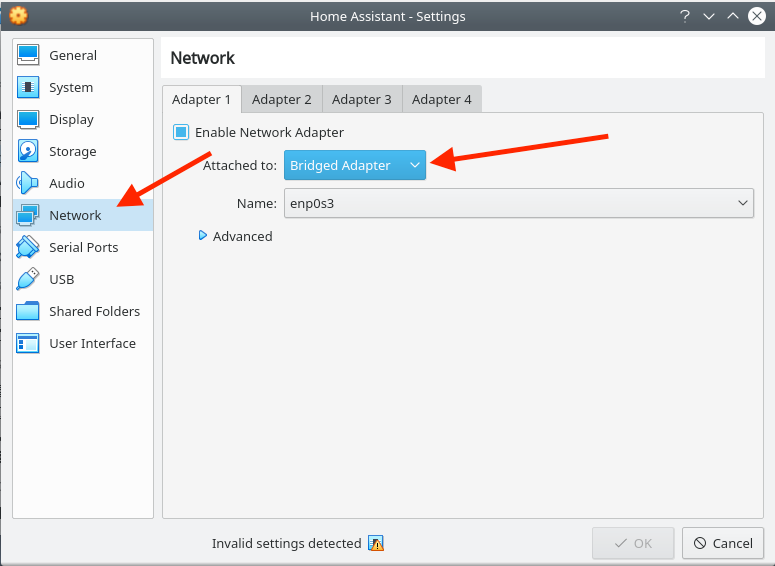
Now head to the setting tab within the Virtualbox environment for Home Assistant and set the network adapter to bridged mode. When you set the network settings for Virtualbox to bridged mode, it will create a logical network interface. The benefits of this, are that you can have a dedicated IP address that is assigned to the Virtual Machine.
It is worth noting, that this will, in effect, create 2 IP addressed that are tied to one machine. One for the Host (the Debian Operating System) and another for the (Guest) Home Assistant VM. If you decide to add more VM’s at a later date, those can also have separate IP addresses, even though they are all on the same physical machine.
Once the VM is up and running you will be able to see this for yourself by using a network scanning tool like Fing or Angry IP Scanner.
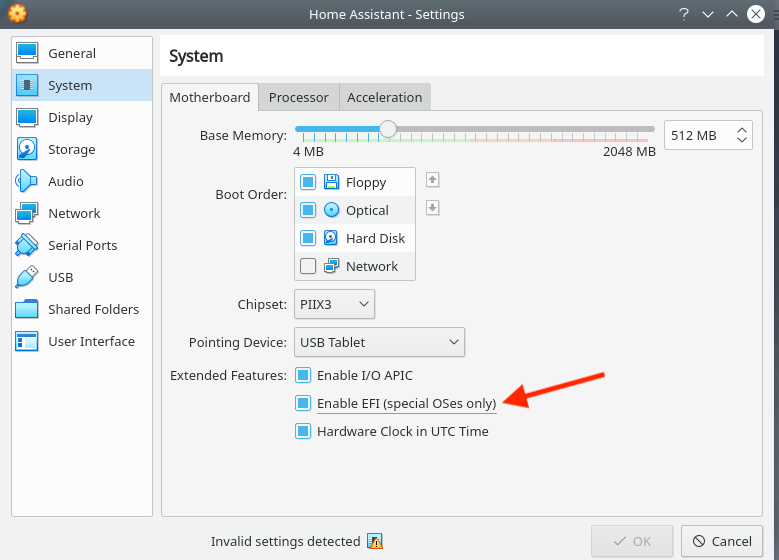
Enable EFI from within the System tab. This is an important step, as without enabling the EFI option, the VM may fail to boot.
We should now have everything configured correct. Start the Home Assistant VM.
Once the VM has started, you should be greeted by the “Welcome to Home Assistant” screen.
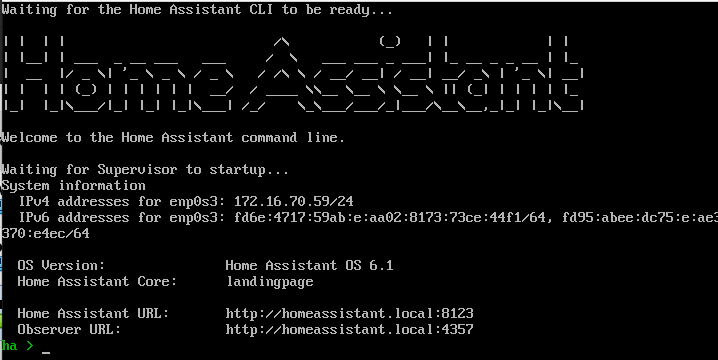
You should now be able to access the Home Assistant on the following URL: http://homeassistant.local:8123
If that doesn’t work, you may need to replace the “homeassistant.local” with the local IP address the VM has been allocated via DHCP. This can be found on the boot screen above by the IPv4 addresses, so mine would be http://172.16.70.59:8123

Now we have Home Assistant installed and working, we just need to enable auto-boot of the VM and also enable UBS passthrough so, if you use a Zigbee or Z-Wave hub, it can access Home Assistant directly.
How To Enable UBS Pass-thorough for Home Assistant running inside Virtualbox
So our devices that use external hubs, like Zigbee and Z-Wave devices can talk directly to Home Assistant, we need to pass those USB devices from the external side of the VM, into the Home Assistant virtual machine we are using.
First we need to install the Extension Pack for Virtualbox, this can be achieve by using the “wget” command that we used earlier. Simply open the command line interface from the Konsole within the desktop environment of the Debain server.
Type the following to download the extension pack:
wget https://download.virtualbox.org/virtualbox/6.0.10/Oracle_VM_VirtualBox_Extension_Pack-6.0.10.vbox-extpackThen use the following command to install the Virtualbox Extension Pack
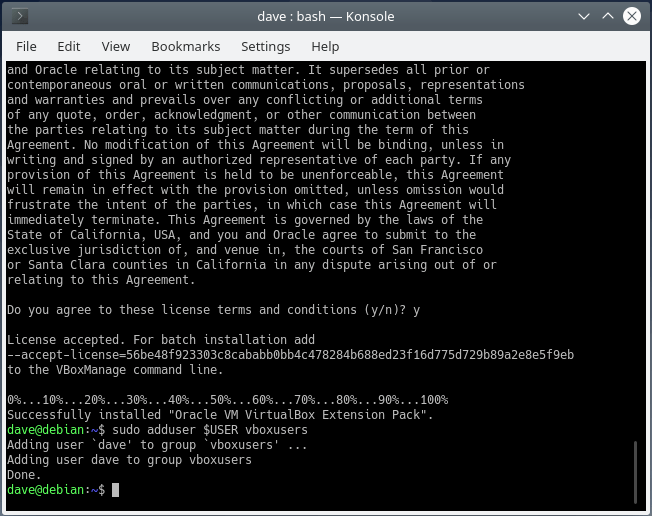
sudo VBoxManage extpack install Oracle_VM_VirtualBox_Extension_Pack-6.0.10.vbox-extpackYou will be greated with a prompt that asks you to agree to the terms and conditions of the Oracle license. Simply water “y” to agree and the extension pack will install.
The next thing we will need to do is add our user account to the vboxusers group, this can be done with the following commands:
sudo adduser $USER vboxusersThe output at the end should look like this:
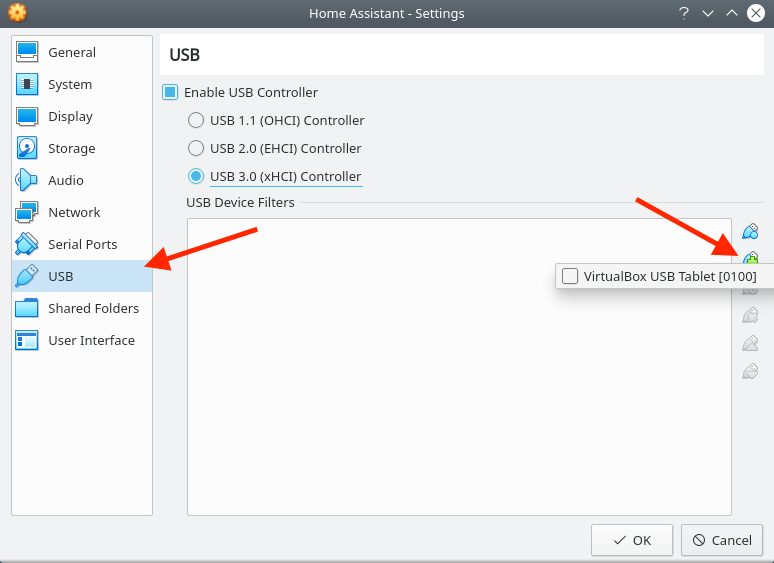
Ok, we will need to test that Virtualbox is seeing the USB devices, first I would recommend rebooting the server at this point, simply issue the sudo reboot command from the command line interface.
Once the machine has rebooted, open up Virtualbox, then the Home Assistant VM, and head to the UBS section within the settings for the VM. If you press the green plus symbol on the right hand side, you should see your USB devices listed there, you can now add them to the Home Assistant VM and they will be able to talk directly to the VM.
How To Enable Auto-Boot of the Home Assistant VM
f you’re anything like me, you want running a server to be a trouble free as possible. Unfortunately, from time to time, there is a need to reboot the server, or in some cases, a sudden loss of power. Having your system setup so the VM’s will start automatically is a real help in most cases.
Simple follow these steps to have your Virtual Machines restart after a reboot or sudden loss of power.
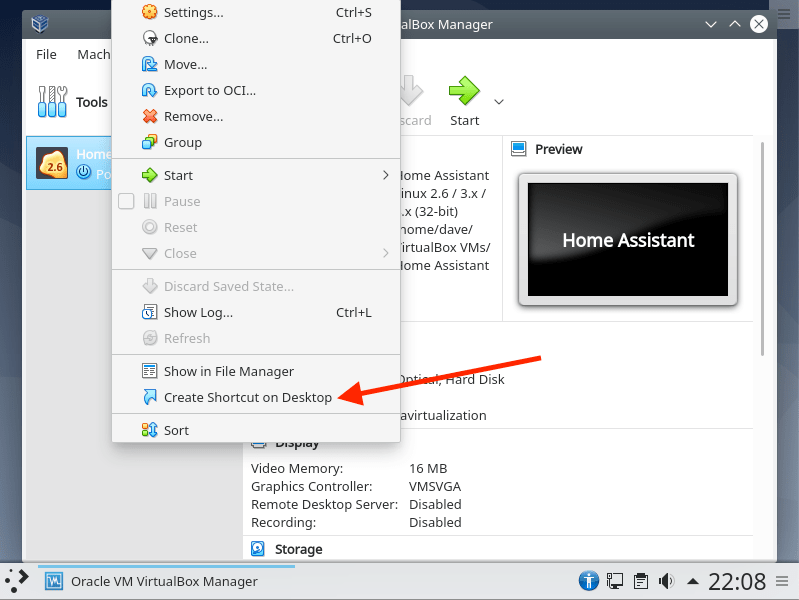
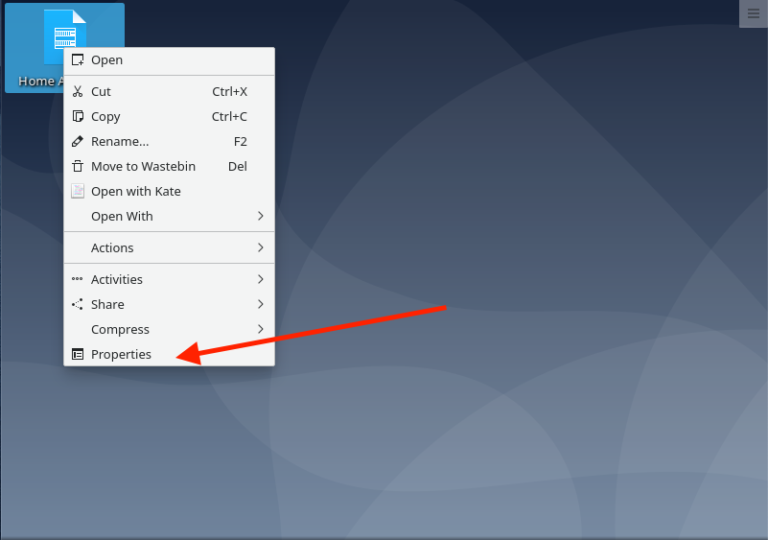
With the main page of Virtualbox open, right click on the Home Assistant Virtual Machine, it will open a menu, click the “add shortcut to desktop” option.
Navigate to the desktop, right click on the new icon for Home Assistant, select the Properties of that icon.
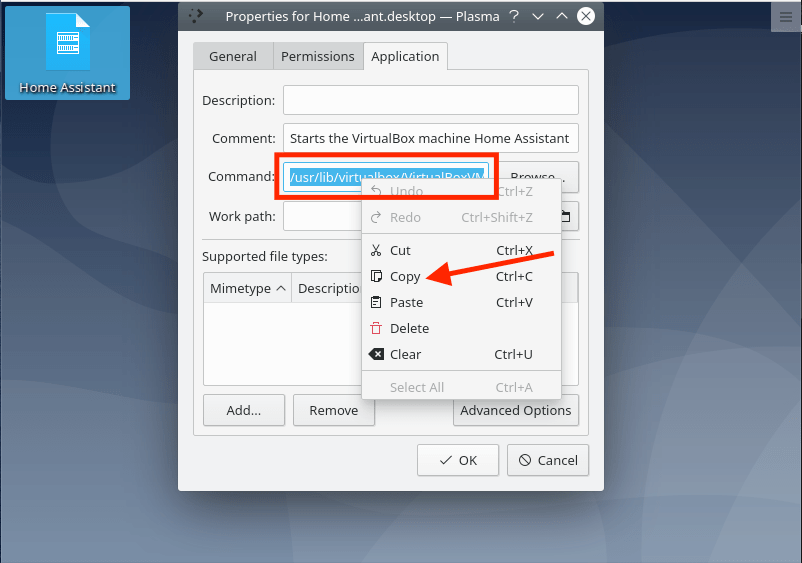
Within the Application section of the Properties, copy everything from the “command” section.
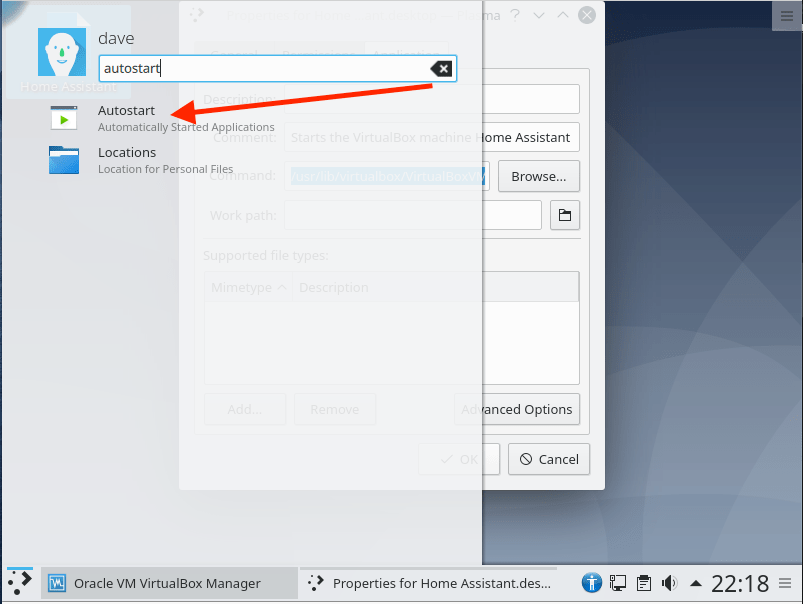
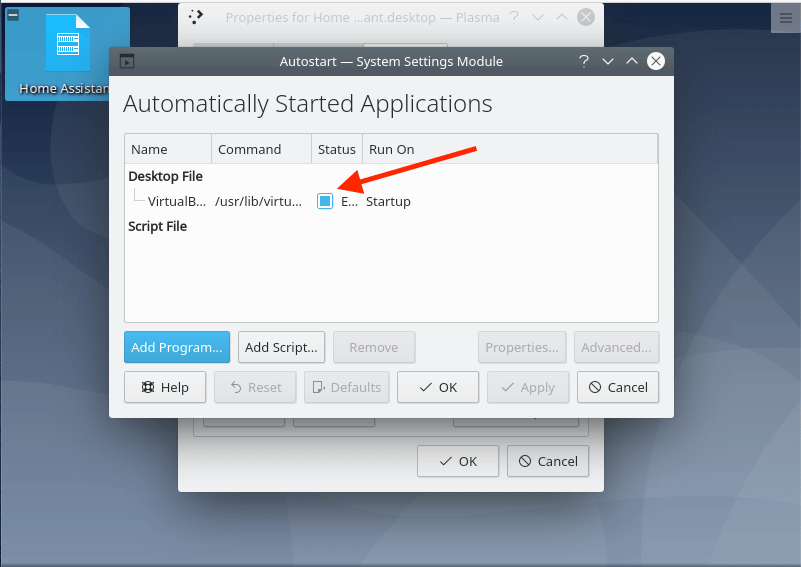
From the main menu bar, search for “autostart” and open this application.
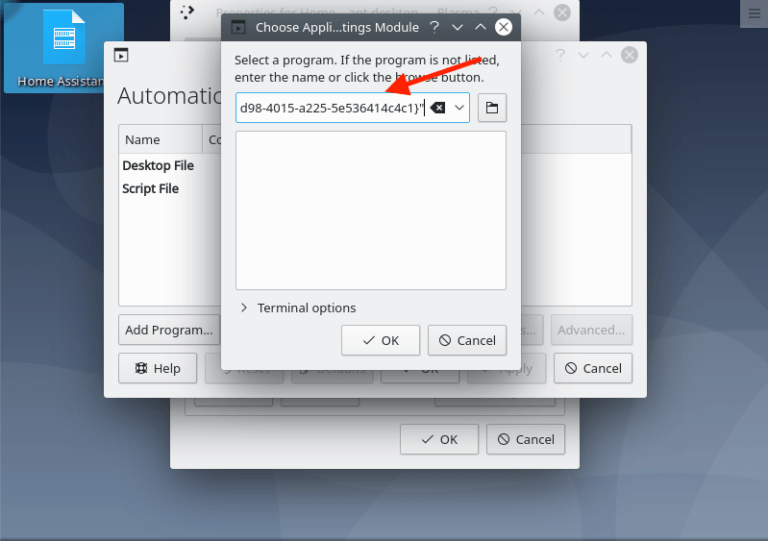
Once the Autostart application is open, click the “Add Program” option and at the top, paste everything we copied from the properties of the home assistant short cut.
On the next screen, simply click ok to exit out of the “add program” section, you should now see Home Assistant has been added to the autostart option.
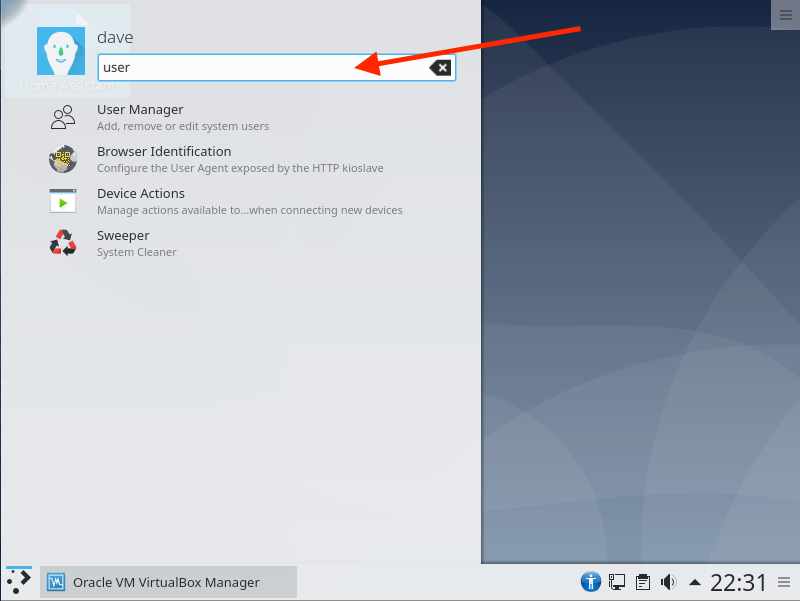
The very last thing we need to do, is to enable auto login for our user account. Simply search for the user settings from the main menu.
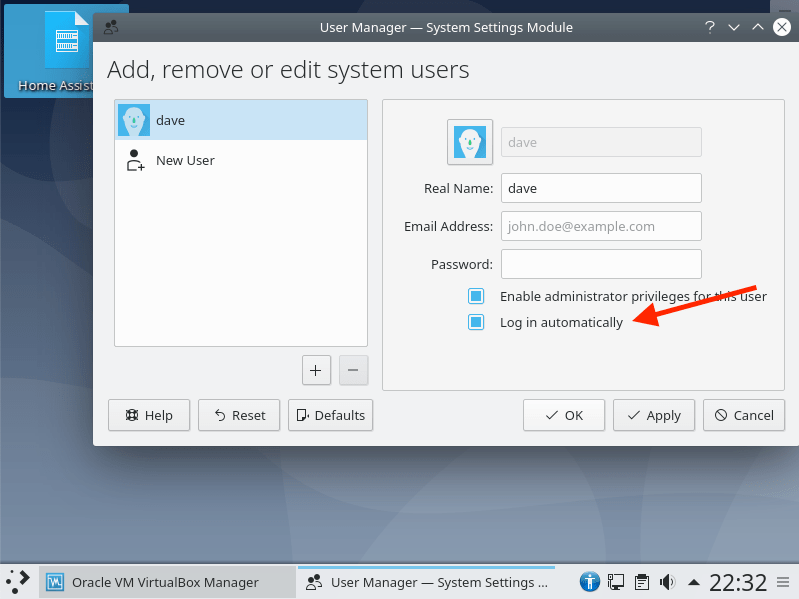
You will be asked to enter your password to confirm this, but after that, everything is done. You should now have a Debian server, running Home Assistant within a VM that auto starts after a reboot or power loss.